Wednesday, August 31, 2011
Small Potatoes
Many thanks to Cyn for this great idea! We have had many weeks of unusually dry weather this season (after a very wet spring!) The potatoes have produced satisfactorily, but there are more small potatoes than usual.
If you look at the picture, you will see some of the very small ones and then some that are a bit larger that I cut into pieces. In each jar I added 1/2 teaspoon unrefined sea salt and 1/2 of a peeled garlic clove. As Cyn said, these will be a nice addition to the pantry and will save those small potatoes from being wasted!
I processed the quart jars for 40 minutes in a pressure canner. Very easy and quick to do. Please go to her blog for more of an explanation. If you don't have experience canning, and want to do this, please consult an up-to-date book of instructions. Here is a good one:
http://www.amazon.com/Ball-Blue-Book-Guide-Preserving/dp/0972753702/ref=sr_1_1?ie=UTF8&qid=1314832447&sr=8-1
Friday, August 26, 2011
Pizza Sauce
It would be easier to make this sauce with paste - type tomatoes. I did not grow any of those this year. They have considerably less water in them. I wanted to make pizza sauce, so here is how I did it:
Here is my Victorio Strainer. In this nice device, you can strain raw tomatoes! I just washed them and cut them into chunks and put them through the strainer:
Here is a view from the top. When our children were young and still at home, they would argue over who got to crank the strainer. :)
I placed a big bowl on top of a folded towel to catch the inevitable drips:
Here you can see the pulp coming out the back end:
When I had strained all of the tomatoes, I put the pulp back in the strainer and ran it through one more time:
I lined a large colander with a cotton cloth. (I use an unbleached flat birdseye diaper.)
I set the colander on top of a large pot to catch the drips and let it sit there for 1 hour. It could have sat longer, but I didn't have room in the refrigerator and was worried it might spoil.
So, then I transferred it to a Crock Pot, and set it on "high" and left the lid off. Every once in a while I would go back and stir it carefully. When I went to bed last night, I turned it on "low" and this morning it was all ready. Here you can see how thick it had gotten:
There were two quarts of nice thick tomato sauce. I added:
2 Tablespoons Italian Seasoning
1.5 teaspoons sea salt
a little sprinkle of ground cayenne pepper
Then I ladled it into half-pint jars (1 cup), 8 of them, and processed it in my steam canner for 35 minutes. You would need the same amount of time in a water bath canner.
I still need to learn how to make good mozzarella cheese. I have tried, but not really concentrated on it enough to master it. Maybe that will be next.
Oh! I do love a good pizza made with wholesome ingredients!
Wednesday, August 24, 2011
Cantaloupe
We live near Jackson County, Indiana, which is famous for their melons. "Jackson County Melons" is something we look forward to each year. They are abundant and generally are available at low prices.
A neighbor brought us two big ripe cantaloupes yesterday. I had just bought two, and don't want to waste any of it. So here is what I did:
This is a "melon baller."
Here is a cantaloupe cut in have and then I scooped out the seeds with a spoon:
I used the melon baller to scoop out little balls of the ripe cantaloupe:
and placed them on a tray to be "flash frozen." I put the two full trays in the freezer and when they are thoroughly frozen, I will pop all of the little balls into freezer bags and use them in fruit salads later:
Then I scraped all of the extra melon flesh out and...
Put it through the juicer:
I am freezing the juice in ice cube trays. These cubes I will save in freezer bags and use them in fruit smoothies!
This can also be done with other melons ~ watermelon, honeydew, etc.
Friday, August 19, 2011
Canning Peaches is Easy! (No Sugar.)
In 1976 I was expecting our 3rd child. We lived in rural Nebraska, renting a house on a farm there. That is where I had my first garden, and that is where I learned to can food. Money was always in short supply, but we made it. My husband has always provided for us, and has worked very hard through the years. Now he is "retired" and he still works very hard here at home keeping us afloat. His "list" just gets longer and longer.
In those days, we only went grocery shopping once a month. I clearly recall finding some "lugs" of fresh peaches at the grocery store and we bought 2 of them for me to can. What riches! I had a nice canning instruction book and so, I canned them. The only problem was my little daughter, who was not yet 2-years-old, picked that day to be very unhappy. I put her in my baby back-pack and proceeded. I remember telling her that if she watched carefully, then next year I would let her can the peaches! I didn't realize until I finally sat down to rest that afternoon that she was sick. She had a fever and I discovered she had chicken pox. Poor little thing! I had many opportunities to be grateful for those peaches. Toward the end of the month, we would nearly run out of food, and the 2 little children I had at the time ate many a meal filled out with home-canned peaches.
Years later, a friend told me how to can peaches without using any sugar. Basically, you do it the same as for tomatoes. And now I will show you how.
First, get some peaches and let them get ripe:
Here is how to check for ripeness. Press your thumb into the flesh of the peach near the stem. If it is getting soft, it is getting ripe. Eat one to be sure it is as ripe as you want it to be. If it is not ripe enough, the skin will be difficult to take off:
Carefully wash and rinse your jars. I used pint jars this time, but you can also use quarts, if you like:
Put the "caps" in a small pan of water on the stove and bring to just below simmer. Let them sit there, keeping hot, while you get ready to use them:
Bring a large saucepan filled 3/4 with water to a boil:
Fill the sink with cold water:
You will need a sharp little paring knife:
Get the "rings" ready:
This is what I use to lift the caps from the hot water. It has a magnet on the end. But before I had this, I always fished them out with the tine of a fork:
You will need a large slotted spoon:
Carefully put some peaches into the boiling water and leave the heat on high for about 20 seconds:
Take them out with the slotted spoon:
And put them in the cold water:
Using your paring knife to help, slip the skins off the peaches. This is not a very good picture of the process, but you will see how easy and quick it is. If the skins don't slip off easily, either the peaches are not ripe enough, or you need to scald them a little longer.
Next, cut the peach in half, twist the two halves apart and remove the pit:
Place the peeled peaches, in halves or pieces (depending on the size and fit) into the jars:
I like to use wide-mouth jars, but if I don't have enough, I use regular mason jars and use this red thing to push them down. I think it came along with my Victorio Strainer. If you have wide-mouth jars, you can easily push the peaches down with your hand. The idea is to push them gently until the juice comes up some. I was able to fit 2 - 3 peaches in each jar:
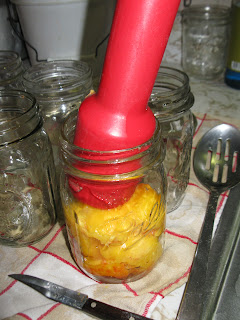
Here is a full jar. When it is filled up to the bottom of the jar threads, carefully wipe off the rim of the jar with a damp clean cloth, put on the cap and screw on the ring firmly. Not too tight!
Here is one full and closed, ready to process:
Here are 10 pint jars in my steam canner. You can use a water bath canner, of course.
When the water is boiling in the water bath canner, then start counting the time. They need 25 minutes for pints and 30 minutes for quarts. Here they are after coming out of the canner.
Incidentally, leaving the sugar syrup out has advantages. It's less expensive to do, healthier of course, and they really do taste marvelous! They kind of remind me more of canned apricots after being canned like this in their own juice. You will love it! It is also much easier and quicker to do.
I have found that when canning anything, once you get your "system" set up, it's easy. Think it through carefully, prepare everything you'll need and proceed. Enjoy!
This post is linked at Wardeh's Simple Lives Thursday #57 !
Monday, August 15, 2011
This is for you, Mely!
Recently, my online friend, Mely, asked for pictures of our vegetable garden. :) This time of year is quite embarrassing, but I think the experience is probably almost universal. We blissfully prepare our soil in the spring and plant the seeds with hope and enthusiasm, looking forward to a sure and bountiful harvest. As the season progresses, we cultivate, fertilize, squish unwelcome insects, enjoy the beauty and burgeoning life all around us. And then the harvest begins. We pick, continue to cultivate, and preserve and eat. And then it happens. The weeds take over! That's ok. We've kept them at bay long enough to still get plenty of food.
Here is a view as I approach my weed patch:
Between the rows of flour corn... when I was a child, I loved playing in the corn fields. Looking down a row of tall corn takes me back home to those golden days...
Look at this Cushaw squash! I put my booted foot there so you can see how large it is:
Looking down the tomato row:
The potatoes! (They have died back now, as they should, and all you can see is weeds. My husband will weed-eat the weeds before I dig the potatoes, maybe next month.)
Here is one ear of the flour corn. You can see how wonderfully big it is!
The sweet corn is spent:
Sweet potato vines... still quite happy:
A bell pepper:
And some jalepenos:
The cucumbers are looking rather sad now:
Green bean rows:
Isn't that pretty?
Still waiting for the leek seeds to mature:
Oh no! Wild morning glories! That is one of the worst weeds I ever have to fight, but they are pretty:
And now you can see what I brought in this morning. Peppers:
Tomatoes:
A few green beans:
And here you can see a jack-o-lantern pumpkin:
I do love gardening in all it's varied stages. I know that if we were to do more mulching it would eliminate a lot of the weeds. We just don't do much of that.
Now what do you think, Mely? :)