Saturday, March 28, 2015

A Tiny Baking Tip...

I accidentally discovered something that has improved my baking considerably! When I can, I like to use whole grains (as opposed to white flour) in baking.  For years I've gone back and forth between using whole wheat flour in our cornbread and was never happy with it, so then I'd relent and go back to using unbleached white flour... until today!

Ta Da!!!

A while back I purchased some King Arthur Whole Wheat Pastry Flour to use in pie crusts.  It is very nice.  It is also a wonderful substitute for unbleached white flour!  (If you are not a baker, you will not quite understand my elation.)  I buy this flour at a bulk food store about a half-hour's drive away.

I made corn bread.


It is moist and tender and wonderful, as opposed to dry and crumbly.  

Here is my recipe:

Corn Bread

Pre-heat oven to 425 F.
Butter a pyrex 9 x 9 baking pan

In a mixing bowl, combine the following:

1 cup whole ground yellow corn meal
1 cup King Arthur's whole wheat pastry flour
1/3 cup sugar
5 teaspoons baking powder
1/2 teaspoon sea salt

Whisk together, then add:

1 large egg
2 Tablespoons extra-virgin olive oil (or melted butter)
1 cup whole milk

Stir it all together with a fork and then pour batter into prepared pan.

Bake for 20 - 25 minutes until it tests done.

Serve with butter!

Thursday, March 19, 2015

My Wonder(ful) Bag!

Have you ever heard of a "Wonderbag?"  Also known as a "thermal cooker," it is an insulated bag, filled with polystyrene beads or wool to insulate it, that is used kind of like a slow cooker.  You cook the food for a short time on the stove (or other heat source) then you cinch it all up in this bag and leave it in there for the prescribed time and when you open it up, the food is all nicely cooked and lovely.

I have wanted one for a long time, but if you follow the link I put up there, you can see they are rather expensive, and so that was out of the question.  Particularly, since I don't know how much I would actually use such a thing, I tried, more than once, to find a pattern to sew my own, but there didn't seem to be one available.  A couple of days ago, I happened to see a video on YouTube that taught me how to make one!  So, I did!  And there it is!  I didn't have to go and purchase anything to make it.  I already had the fabric, and wool fiber for stuffing, and my husband had paracord and the little clip thing for cinching it up.  Here is a link to the video:


I tried it out today, to cook our supper, and it worked perfectly!  I used my 5-quart cast iron Dutch oven to make this wonderful meal.  Here is how I did it.

Heat the pan and then add a little lard (or other fat of your choice) and some chopped up bacon.


Brown 6 pieces of chicken. (I had thighs.)


Add 1 Tablespoon of all-purpose flour, 1/2 teaspoon ground poultry seasoning, salt the chicken well and add some black pepper too.
Then pour in 2 pints of chicken stock or bone broth and 2 cups of water. Also 1/2 cup plain full-fat yogurt.
Add a chunked onion, some minced garlic and a few potatoes cut into chunks.
Stir together.


Cover and bring to a boil and then simmer for 15 minutes.
Place the hot lidded pan into the cooker. (I lined it with kitchen towels to keep it clean.)
Cinch up the bag, inserting the "lid" carefully in the top of the cooker.  Tuck it in all around.


Let is sit for 4 hours.  Then open it all up.  Be careful.  It is still hot!

I checked the temperature when I opened it, just out of curiousity.


I couldn't wait.  I ate dinner a little early tonight.  It was delicious!


This little bag saves energy, is convenient and safe to cook while you are away or even overnight.  There is also a Wonder Oven, that is larger, and I have seen examples of where people just use lots of blankets and towels to wrap pots up and put them in a laundry basket.  These used to be called "hay boxes" and hay was used as the insulation.

It was fun.  It was not difficult to make, although it did take me a few hours to do it!  Next time will be easier. If you found yourself in a situation where you had limited fuel for cooking, this would be very convenient.

Here is another picture of the cooker with the lid:


Tuesday, March 17, 2015

Irish Soda Bread - March 17, 2015


When our children lived with us, we made somewhat of a celebration of St. Patrick's Day and would always rehearse his history and selfless contributions that he made to the Irish people in his lifetime.  Then we always had corned beef, cabbage, potatoes and Irish Soda Bread for dinner!

Now that it is just my husband and me, I have opted for making a batch of Irish Soda Bread.  I just ate some.  It is wonderful and I wanted to share my most recent method and recipe with you, Gentle Readers.

IRISH SODA BREAD

Preheat oven to 375 F.

In a bowl, combine the following

2 cups unbleached all-purpose flour (I love King Arthur's)
1/2 teaspoon sea salt
2 Tablespoons white sugar
2 teaspoons baking powder
1 teaspoon baking soda

Whisk that together well, then...

Grate in 3 Tablespoons of COLD butter, mixing it in with your fingers, a bit at a time.

Then, combine the following:

3/4 cup plain full-fat yogurt (my favorite is Dannon)
1/4 cup whole milk

Add the liquid, all at once, to the dry ingredients and stir with a fork.

The dough needs to be moist but not sloppy.  Adjust the amount of flour, or add a little more milk if needed.

Turn dough out onto a floured surface and only knead it a LITTLE BIT.  Just enough to get it into sort of a big round thing.  Don't work it much, as it will get tougher then.

Place on an ungreased baking sheet.  Press into a 7 inch circle.  Using a sharp knife, cut a cross in the top.

Place the baking sheet into your oven and bake for 30 minutes.  When it is getting browned, it is done.  Don't over bake.

Remove and allow to cool on the pan.

Slice, serve with butter and enjoy!

Thursday, March 12, 2015

Luffa Sponges... something new to me!

Last year (2014) my Garden Fairy and her family were still living with us.

That is her, helping to bring in the harvest.  We are just beginning to come out of winter, here, and this picture makes me smile "ear to ear."  If you look up there, in the upper right hand corner, you can just see part of a tower of Luffa gourds that she grew.  Earlier this winter, she came and took a number of them home, but there were quite a few of them left hanging there.  Here is what Luffa's look like when they are growing.  We were amazed at how prolific they were!  They seemed to threaten to take over the garden!


Yesterday the temperature actually got up to 60 F here and it was a beautiful sunny day, so I spent some time wandering around outside trying to see if I could find some dandelion greens.  Sadly, it seems to be too early for those, however, I did find a few oyster mushrooms!  I sauteed those in a little butter.  Oh, they were good!

I also noticed the poor looking Luffa gourds still hanging around looking forlorn, so I pulled some down and they were very easy to peel!  I then brought them in the house, cut them into lengths and removed the seeds.  After that, I carefully hand washed them in some warm soapy water and let them dry.  Voila!  Luffa Sponges!

You would think that at 66 years old, I would have had experience with them before.  I haven't.  I was aware of them, but had never had one or used one.  They are very nice.  When wet, they become soft, but still abrasive enough that they will make an excellent bath sponge.  


By the way, my Garden Fairy is due to have a baby boy in about 3 weeks.  :)


Wednesday, March 4, 2015

A Tiny (embarassing) tip, more about my Phang spindle, some new bread pans, and hankies...

Do you see what I'm holding there?  That is the plug assembly for our kitchen sink.  It is a replacement for the original, which finally broke last year.  Now.... here is the embarrassing  part, and I am telling you this just in case it happens to you.  For quite a while, I've been complaining to my husband that the sink drain seems to smell really awful.  I had tried a variety of things to "sanitize" it and it never did any good.  Then I discovered something a few days ago.  See, on the original plug, the black rubber part on the bottom was a solid piece.  But, on this cheapy, you can actually open it up like this:
I didn't know that!  And there was all kinds of icky gooey nasty stuff in there.  Now that I have thoroughly cleaned it out, the bad odor has disappeared.  Sigh....  Now, I clean it every time I clean the sink. *blush.*

Ok, on to more salubrious topics...

I have done some more spinning on my Phang spindle and I don't have a Nostepinne (yet) so I used the handle of a wooden spoon to wind the single ply yarn off of the spindle.  In order to do that, I rested the spindle in the larger bowl you see in this picture:

Here is the center pull ball I made on the makeshift Nostepinne:
Then I removed the ball of yarn and used the spindle to make a 2-ply yarn.
Here it is all wrapped onto the spindle:
This is not very much yarn.  I was too curious to wait until I had spun more. 
35 grams of yarn, wrapped into a little skein:
It is certainly not the best yarn I've ever made, but I am new to using a support spindle, so it's not too bad.

Lately, I've been making bread using natural yeast that I got from Caleb Warnock who wrote The Art of Baking With Natural Yeast .  A wonderful book, by the way. Sourdough (this is really not sour) is much more easily digested, and often, those with gluten sensitivities can eat genuine sourdough without any trouble.  Yesterday I was shopping with our daughter for baby things (she is expecting a baby boy in a month) and saw some new Pyrex pans, that I thought would work nicely for bread.  I bought two of them and used them to make my bread this morning.  They are not technically bread pans, but I like that they are a bit shorter than usual bread pans, from end to end, and the handles are nice.  Here is one of the pans - not washed, after the bread was removed:
and here are the two loaves of bread:
This recipe is Caleb's "Grandma's Bread" that I love so much.  The only thing I changed, is I add 1 cup of King Arthur's unbleached bread flour along with the whole wheat flour when I make it.  That is not necessary.  I have made the 100% whole wheat bread very successfully too, but I like the higher rise the unbleached gives it. 

I am 66 years old.  When I was a young child, there were no "facial tissues."  We used handkerchiefs to blow our noses.  This past month, I had influenza, followed by pneumonia and bronchitis.  It took the whole month, and in that time, I went through two whole boxes of tissues.  I know, I know... so what's the big deal?  I'm such a penny pincher.  So, for the price of the two boxes of tissues, I bought 3 yards of cotton print fabrics and am making 12 hankies for myself.  I have 4 of them finished and have been using them and am very pleased. 

Here is one that is finished, on top of the fabrics I have not sewn yet:
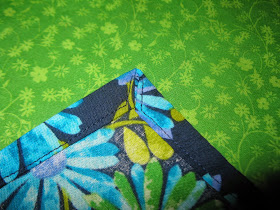
I am making them from 18 inch squares of fabric, sewing up a narrow hem and doing the corners like so:
I carry one in my pocket and use it all day and then throw it into the wash.  Don't be alarmed.  We must wash our hands after blowing our noses, even if we use disposable tissues.  This will save me several dollars a year, they are softer on my nose, too, and make my frugal heart happy.  :)


Monday, March 2, 2015

My new spindle!

I mentioned before that I know how to spin.  My spinning wheel is an Ashford Traditional, and my favorite.  I've tried others, through the years, but the Ashford and I get along very very well.  I have a new spindle, however.  I've had a few "drop" spindles, and they are nice, but this new spindle is really pleasurable to use.  It is a "Phang" spindle.  This is a supported spindle.  You rest it in a small bowl on the table, chair or floor of where you are sitting, instead of having the spindle hang from your yarn as you spin.  I wish I had realized how nice it is to use a supported spindle long ago!  I found this one on an Etsy shop here:  http://www.etsy.com/shop/tinasangoras.  As I've looked around the web, watched YouTube videos, etc.  I see that I could probably actually carve one for myself.  (Note to self - this would be a nice project for a summer's day in the woods. )

It will take a while to get skillful with this spindle, but there is no hurry... in fact, it is soothing and gentle to use.  This particular style of spindle originated in India.

Here is mine, with a little yarn I've managed to make with it: