Tuesday, January 31, 2012
My husband hates Curry...
He really does. That would not be a problem, but I love curry and he can't even stand the smell of it. Sigh... One must be kind to one's husband, so I NEVER make it. I was recently whining to a friend of mine about the problem and the horrible life I have because of it. ;) She said I could come to her home and make curry. So, I did!
Here is my recipe:
THE MOST WONDERFUL CURRY IN THE WORLD (Well, it seemed like it, since it's been well over a year since I had any curry at all! :-0 )
1/4 pound lamb stew meat (you can substitute beef or poultry meat, if you like)
4 nice apples
2 Tablespoons extra-virgin olive oil
1 large onion, cut into thin wedges
1 teaspoon curry powder
1 teaspoon ground coriander
1/2 teaspoon ground cumin
4 cups homemade chicken broth
1/2 teaspoon sea salt
1/4 teaspoon freshly ground black pepper
2 cups carrots, peeled and sliced diagonally
3 cups peeled and cubed sweet potatoes
Cut the lamb meat into little cubes. Peel, core and cube 3 of the apples.
In a cast iron Dutch oven, or other heavy bottomed kettle, heat the olive oil on medium low. Add the meat and, constantly stirring, cook it until it is all brown, but not seared. Lamb needs to be cooked gently.
Add the onions, cubed apples and the spices, salt and pepper and cook, stirring, for 2 minutes.
Pour in the broth and bring to a boil. Cover and simmer for 30 minutes, stirring occasionally.
Add the carrots and sweet potatoes to the pot. Return to a boil and reduce the heat. Simmer, covered, for 20 minutes, stirring occasionally.
Cut the remaining unpeeled apple in half. Remove the core and slice into small wedges. Cut the wedges in half. Add them to the pot and simmer for 10 minutes.
Here is the story in pictures:
Cubed lamb meat:
Lamb after gently browning in extra-virgin olive oil:
Cutting 3 of the apples into cubes:
Cutting the onion into small wedges:
Apples and onions added to the browned meat and spices added in:
Covered, simmering:
Peeled carrots are sliced diagonally:
About 2 cups of the carrots:
Peeling the sweet potatoes ready to cut into 3 cups of little cubes:
Here is the unpeeled apple ready to put in the pot for the last 10 minutes of simmering:
And here is the curry all ready to eat!
This recipe is linked up at Kelly's Real Food Wednesday!
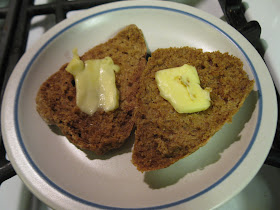
Yummy Buttery Scones
I LOVE scones and wanted to come up with a healthier version. Here it is:
Healthy Scones
1/2 cup sourdough starter
1 egg
1/4 cup whole milk
1/2 cup butter
1 1/2 cups whole wheat flour
2/3 cup dehydrated cane juice (either Sucanat or Rapadura)
1/2 teaspoon nutmeg
1 teaspoon baking soda
1/2 teaspoon unrefined salt
At least 7 hours before baking, whisk together the sourdough starter, egg and milk. In another bowl, combine the flour, dehydrated cane juice, and nutmeg. Cut in the butter until it is crumbly.
Pour the liquid ingredients over the flour mixture, stir to moisten all of the flour, cover tightly and let rest at room temperature for at least 7 hours or up to 12.
When it is time to bake, pre-heat the oven to 350 degrees F.
Dust your work surface with unbleached flour and pour the dough onto it. Using a little more flour to prevent sticking, press the dough to flatten it somewhat and sprinkle the salt and baking soda over the dough. Make sure the baking soda has no lumps.
Fold the dough in half and press it out again. Do this 15 times altogether.
Divide dough in half and form into two rounds. Flatten them with the palm of your hand to about 6 inches in diameter.
Cut each round into 8 equal pieces and put them on a baking pan, either un-greased, lined with parchment paper, or a silicone baking mat:
Bake at 350 degrees F. for 25 minutes. Here they are! These scones are sweet, tender, and delicious. Best eaten warm with real butter, but they keep well and can be reheated.
Thursday, January 26, 2012
A Faux Chenille Baby Blanket
I ran across this blog post recently and was enchanted... Fortunately, I had some lengths of cotton flannel fabric on hand.
I used 1.25 yard pieces of 2 different flannel prints. Two of each print. They are layered like this: The first one is placed right side down. Then, layer on the two contrasting pieces. It doesn't much matter which way you put them, right side up or upside down. Lastly, place the last piece right side up.
Pin the layers together, using plenty of pins. Then, sew seams on the bias, one inch apart, all across the layers until it is covered with the stitching. My main fabric has little pink polka dots all over it, so it was easy to follow the lines for the stitching.
Using your sewing shears, cut through THREE layers of the fabric, half-way between every 2 lines of stitching.
Carefully sew around the edges to baste all the layers together, and then apply bias trim all around. I made my bias from 1/2 yard of flannel, following the instructions in this video:
http://www.youtube.com/watch?v=12VNavQleCM&context=C389d683ADOEgsToPDskL8VIhF0R4TqilgAxhgfKNr
Before I sewed on the binding, I trimmed the corners to make them curved.
Here you can see a detail of the side where I finished the binding by stitching it on by hand:
Here is the blanket before I washed and dried it:
And here it is after it was washed and dried. It is beginning to fray nicely.
I really don't have a victim for this blanket just now, but I'm certain one will show up someday and I'll be able to give her a nice snugly blanket!
My dolls will keep an eye on it until then. :)
Saving the Pumpkin!
I had a nice little pie pumpkin sitting on the counter getting sadder and sadder. I didn't want him to go to waste so this is what I came up with.
Pie Pumpkin with Sausage/Rice Stuffing
1/2 cup brown rice
1 cup water
1/4 tsp. sea salt
1/2 pound bulk pork sausage
2 Tablespoons butter
1 green onion
1 garlic clove
1 cup shredded mozzarella cheese
small bunch of fresh kale
1 small pie pumpkin
Carefully cut the "lid" from the pumpkin and scoop out all of the seeds.
Bring 1 cup water to a boil, add the salt and stir in the rice. Cover. Place over low heat and simmer for 45 minutes. Make sure it doesn't run out of water. It is better to have a little extra and drain the rice than to not have enough to finish the cooking. Alternately, you can combine the water, rice and salt and allow to soak for 12 hours before cooking the rice.
Preheat the oven to 350 degrees F.
In a heavy skillet, brown the sausage, chopping it up. While it is cooking, dice the green onion and mince the garlic and add that to the skillet. Stir frequently.
Take the tough ribs out of the kale, chop and add to the skillet. Stir and cook until the kale is well wilted, then stir in the mozzarella. Remove from heat. Add the butter and the cooked hot rice and combine well.
Spoon the mixture into the pumpkin. Replace the "lid" and put the pumpkin in an oven-proof bowl or dish.
Bake until when you insert a sharp knife into the pumpkin flesh, it pierces all the way through easily. Remove from oven and let rest for 10 minutes before serving.
Serve slices of pumpkin along with some of the filling. This will reheat nicely the next day, too.
Saturday, January 21, 2012
Another Breakfast of Oats!
I love oats... I love oatmeal... here is my newest way to enjoy them for breakfast!
Oats for Breakfast - 1 serving
1/2 cup whole oat groats
1 Tablespoon live whey
1 Tablespoon whole wheat flour
1/8 teaspoon salt
water
24 hours ahead of when you want to serve these, rinse the oat groats (they are just whole oat "berries"), cover them with water, about 2 inches above the oats. Stir in the whey and whole wheat flour. Cover and allow to soak at room temperature.
After 24 hours, drain and carefully rinse. Return the soaked oats to a heavy-bottomed sauce pan.
Add water until it is 1 inch above oats. Bring to a boil and simmer for approximately 30 minutes, tasting a few now and then until they are as tender as you want them to be. Be sure to keep enough water in the pan to cover them.
When the groats are done, strain out any extra water. Serve with butter, milk, and maple syrup.
This post is linked to 11th Heaven's Homemaking Haven!
Also at Monday Mania!
Tuesday, January 17, 2012
Goodie Balls
I've been making these, in one form or another, since 1976! Most of you, my gentle readers, were probably not even born then. :)
Goodie Balls
Peanut Butter
Honey
Unsweetened, medium flake, dried coconut
Brown sugar (or Rapadura)
Mix equal parts of peanut butter and honey. Gradually stir in the coconut until the mixture is stiff enough to roll into little balls.
Roll the dough into small balls and then roll them in brown sugar or Rapadura (which is more finely ground than Sucanat.)
You may also add raisins or other chopped dried fruits or chopped nuts. Other nut butters can be substituted as well.
Friday, January 13, 2012
Saving the Carrots
Sometimes I buy too many carrots. I don't usually grow very many, because, well... I guess I get tired of the thinning and fighting the weeds until the little things get going. They take forever, it seems. That being said, I have had a few very successful carrot crops. Not this last year. So, I've been buying them at the grocery store. And like I said, I buy too many. I think my idea of what is "enough" has not quite calmed down since the children all left home.
About 3 pounds of carrots were in our refrigerator and they had little white roots all over them. I had to face the facts. They were not going to get eaten before they rotted.
Lacto-Fermented Carrots
1/2 gallon jar
Either a lid with an airlock, or some nice clean rocks to hold the vegetables under the brine
3 pounds carrots (approximately)
1/4 cup kefir whey (other live whey would do just as well)
1 quart of water (+ maybe just a little more)
1 Tablespoon sea salt
Wash and peel the carrots, cutting off the tip and the stem ends.
Slice them all thinly, either with a sharp knife or in a food processor
Place the sliced carrots in the jar. Mix together the whey, salt and water until the salt is dissolved and pour that over the carrots. You might need just a little more than a quart of water. The carrots need to be submerged.
Top with an airlock lid, OR, put some clean rocks on top to hold the carrots under the brine.
Let it sit on the counter for 3 days. Taste them. If they are getting a little sour (not rotten), store them in the refrigerator.
I really like these! They will continue to ferment in the refrigerator, but it will be slow and I will enjoy them for quite a while to come.
Thursday, January 12, 2012
Lamb Chops - Quick and Easy
Have you ever cooked lamb chops? There are many methods and fancy recipes to be had in books and on the internet, but here is my favorite way to make them. For 4 darling little lambchops... sigh.... :( heat 2 Tablespoons of ghee in a small cast iron skillet on medium-low heat. If you don't have ghee, you can use kettle-rendered lard.
Place your chops in the pan. Allow to cook gently (adjust the heat so it is not too hot) for 3 minutes. Turn them over and cook for 3 more minutes.
Salt lightly and serve!
The thing to remember with lamb, is that you do NOT cook it at high heat as you can with beef. You do not want to sear the meat. Just cook it gently until it is barely done and then it will be tender and moist.
Be sure to eat all of that good fat. Lamb fat is very healthy.
Oh, by the way, that sort of purple glob is some blackberry jelly a friend made for me. Some people like lamb with mint jelly, but I didn't have any.
This recipe is linked with Simple Lives Thursday #78!
Wednesday, January 11, 2012
2nd Tiny Tip of 2012
Have you ever priced nice duvet covers? :-0 !!! We have a wonderful down comforter that I put on our bed in the colder months. It needed a cover. I bought 2 second-hand bed sheets at a thrift store, sewed them together on 3 sides and then turned them inside out. I sewed little ties on the corners of the comforter and inside the corners of the cover to tie it in place. I just use little safety pins to hold the opening closed. It works very well, cost less than $4.00 and I think it's pretty!
Wednesday, January 4, 2012
Kefir - Chapter 16... another cure
A friend of mine had to take several courses of antibiotics. Not long after, she developed very painful colitis. When I became aware of this, I talked to her about milk kefir and asked her if she would like to try it. She said yes, and I got her started. That was 2 weeks ago. Last Sunday, I asked her if it is helping. Her reply? "Oh, yes!" Now, I realize that her case is not a well established, long lasting problem. I have no idea if this would help others, but in her situation, it has made a big positive difference.
Monday, January 2, 2012
First Tiny Tip of 2012
When I measure out some baking soda or baking powder into something I am making, it always has lumps. I don't want to be an innocent victim of a lingering lump in the baked item, so here is what I do ~ I place the measured soda or powder into the palm of my hand, and smooth out the lumps with the back of the measuring spoon. Voila! No more lumps!
This post is linked with 11th Heaven's Homemaking Monday.