Tuesday, February 26, 2013

I never told you that I know how to spin...

I learned to spin yarn from wool fiber in 1978.  I love spinning, but haven't done it very much since I had to give up knitting and crocheting due to a bit of arthritis in my hands.  Today, though, I had a ray of hope shine through.  I ran across the concept of  "Mega Knitting." It is done with Very Large Knitting needles that have a sort of "hook" on the end.  If you'd like to see, go look at THIS video.  It seems to me that the work my hands would need to do is completely different than traditional knitting and would be very gentle.  I ordered a pair of the size 50 knitting needles and am going to try it out. 

Then that inspired me to start spinning some Really Thick yarn, so I made a rough thick and thin yarn from some wool fleece I have.  I carded it by hand, spun it up quickly and then did a Navajo 3-ply on the yarn.  I've never done the Navajo plying before, but it is easy to learn. 

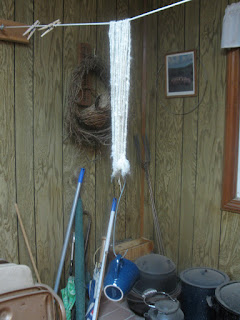
My yarn is now hanging to dry on our inside clothes lines.


It is draped over the clothesline and I used a metal wire hook that I have in the kitchen and hung a pottery mug on it for a weight to set the twist while it dries.


It was fun!

Monday, February 25, 2013

Everybody is doing it! ~ Homemade Laundry Soap

When my kids were young, we had a phrase (that we thought was rather funny), that was useful at times: "Everybody's doing it. Once won't hurt.  No one will know."
:)

That is what came to mind today when I was thinking about this post.  For quite a while, I've been reading lots of different "recipes" for homemade laundry soap/detergent.  I've even tried making a couple of them.  In the past, I used to buy "Charlies' Soap," and for quite a while I was happy with it.  Then, it failed me.  My towels were smelly no matter what I did and the whites got dingy.  So, then I went back to commercial detergent.  One evening I was looking on amazon.com at the Charlies' Soap and also Nellie's All Natural Laundry Soda.  The reviews are very good.  I don't know what went wrong in my house with the Charlies'.

Then, I looked at the websites for the two products and came up with a way to make my own that I thought might work, and save me money.  Many of the homemade recipes call for Fells Naptha soap, and I'm sure that works very well, but it also has toxic ingredients.  So, I didn't want to do that.  I noticed that both of the brands I mention above seem to have coconut oil soap in them.  They also have washing soda.  One recipe I had tried that I like very much also called for table salt.  The problem I have with that one is that it is a liquid and so more trouble to make.  I wanted a powder.

Here is what I came up with.  I like it very much.  It seems to do a great job.  In normal loads (I have an HE washer) I only use 1 Tablespoon of the powder.  If the clothing is very soiled, I will use 2 Tablespoons. I must mention that we have soft water.  That makes a big difference too. 

Ingredients ~

Simply Homemaking Homemade Laundry Soap

1 bar Kirk's original coco Castille Soap
1 cup table salt
4 cups Super Washing Soda

1.  Grate the soap in a food processor with the finest grater 
2. Mix together the grated soap, salt and soda in the food processor
and process until very well combined.

That's it!
I keep it in an empty ice cream bucket, and have the Tablespoon scoop left from Charlies' in there:


I also printed out the recipe and affixed it to the lid so I won't forget how I made it:


If you try this, please come back and leave a comment and tell me what you think of it.  

If I have a significant stain on some clothing, I get that out by hand first, before laundering.  It's easy to do with a plain bar of soap and a little scrubbing brush for most things.  I am sure that when it comes to difficult stains, i.e. grass or grease, there are other products that would be needed, but for general use, I really love this laundry soap.


This post is linked to Simple Lives Thursday # 136.

Sunday, February 24, 2013

Himmel und Erde


This is not a new recipe, but it is new to me.  My sister told me about it. 

What you do is take equal portions of coarsely chopped onions, apples, and cabbage and cook them together.  You can roast them in the oven, but I cooked mine in a cast iron skillet with butter until everything was getting almost tender.  I didn't want it mushy, so stopped short of completely tender.

Then all you do is salt and pepper to taste, mix some olive oil and a good vinegar in equal proportions and mix some of that in it, to taste.  This is surprisingly good!  

Here it is after it was cooked:


And here is my dinner.  I ate it with bacon wrapped oysters.


There was plenty leftover, so the next day I served it over brown rice with some Tamari.  Enjoy!

Oh, by the way, Himmel und Erde means, "Heaven and Earth."  I don't know why it's called that.

This post is linked to the Clever Chicks Blog Hop!

Thursday, February 21, 2013

Seed test report...


Here is what the platter of sprouting seeds looked like the day I checked it and counted the sprouts...

and here is the diagram, with percentages written in.


That, then, revealed the ones that have good, poor, or no germination, and I now know what I'll need to buy for this year's garden.  It is so simple to do this test, and very much worth the "trouble", as it helps you avoid wasting time with dead seed.

Canned Bacon ends and pieces

I've been wanting to can some bacon.  I heard from a friend that our local Wal-mart carries 4# packages of bacon ends and pieces for just $6.88.  So, yesterday, I bought two packages.  Here is one of them.


These were sitting right next to the wonderful Wright brand bacon slices, which of course cost at least twice as much.  Here is what the meat looks like, opened.


If you would like to fry it as usual, you just have to separate the pieces.  There are some tiny ones, once in a while a Really Thick piece, but most of it is just odd shapes.  I couldn't resists.  I had to eat some, so before anything else, that's what I did. ( I cooked it first. ;)

My initial intention was to can it, so here it all is, except a bit I saved to use for bean soup, and the pieces we ate.  I crammed it into little canning jars.  Some of them are 1/2 pint (8 oz.) jars, and some of them are pint jars.  There are 4 pints and 5 half pint jars, so if I had used all of the bacon, I would have had 7 pints, altogether.  Here is the raw bacon in the jars.


A close-up of one of the jars:

If you do this, leave 1 inch head space and be sure to carefully clean the rims of the jars.  I used a terry washcloth wrung out in hot water to do that.
Here are the jars in the canner.

I had processed them for 75 minutes. (If you are going to do this, buy a good, reliable canning guide and follow it carefully.)
Here are the jars, just out of the canner.

And here they are, after completely cooling.

What, you may ask, am I going to do with canned bacon?  Here are some ideas...  make bean with bacon soup.  Fry in a skillet and pour off the bacon grease to save for cooking and eat the bacon, or make gravy.  Fry till crispy, drain and add to a salad.  I can use it just like any fresh bacon I would cook.

This post is linked to Simple Lives Thursday #135
and the Country Homemaker Hop #55 


Friday, February 15, 2013

Garden Planning Day!

Vegetable garden at Monticello

Thomas Jefferson loved gardening.  He kept detailed records, for many years, of his garden at Monticello.  In fact, you can even purchase a copy of his "Garden Book".  I read it once, years ago, and felt so inspired that I started keeping my own garden book.  It was fun to do, but as with so many things when you are raising children, it had to fall by the wayside.  Now, I draw a simple diagram of the garden each year, and  I have the one at hand from the previous year, so I can rotate crops. I do remember how the previous year's crops worked out, so that helps me plan.  For instance, last year the squash bugs decimated our pumpkins and winter squash.  I will not plant any this year, hoping things will calm down in a year or two.  I will try zucchinis, and grow more sweet potatoes to take the place of the squash and pumpkins.  Also, we grew too many potatoes, so we will cut back this year... etc.

Today was my annual "Garden Planning Day."  First, I drew out the diagram.


I know it doesn't look like much in this picture.  I didn't develop it for public view. ;)  On the top of the paper is a list of what I plan to plant, and on the bottom is the diagram.

On to the next thing, then, which is testing the seeds I have on hand.  I put dampened paper toweling on a big platter and them put out groups of the seeds I have on hand that I want to test for viability.


And I drew a map of the seeds.


Then, I put more dampened paper toweling on top of the seeds and covered it with plastic wrap.


I set it on top of the refrigerator (a nice warmish place) and will start checking it in a few days.  Doing this will determine how thickly I need to plant the seeds, and if some of them have very poor germination, I will need to buy new seeds.

Some seeds I will buy at a local nursery soon. We will also buy onion sets and seed potatoes.  I have ordered a few seeds from Victory Seeds today, and my daughter sent some open pollinated varieties for us to try.  Thank you, Lydia!

Here is the basket with the seeds that I am testing.


I am getting very anxious for gardening season to start!  I have hopes and plans!  

How to tie a knot!

If you like to sew, or need to sew by hand, please visit this link for a really easy way to tie a knot in your thread!

Tuesday, February 12, 2013

Faux Chenille Baby Blanket #2


A friend will soon be having her first baby.  A boy! (Can you believe I used to teach her Sunday School class?  Where did the time go??)  Just over a year ago, I made my first Faux Chenille Baby Blanket , and although I've not yet given that one away, it is pink. I already had the fabrics on hand to make a blue one, so, here it is.


The top fabric, before cutting looks like this.  Each two little squares measure 3 mm apart.  That is just over 3/8 of an inch.  This time, I only used 3 layers of fabric, instead of 4, and sewed on every other dark line.  On the pink blanket, the stitching lines were 1 inch apart.  For that reason, I only used the 3 layers of fabric, since this one is stitched much more closely.


Here is the backing fabric, and you can see the stitching lines.


Here is a close-up view of the bound edge.


If you would like to learn how to do make one of these, please see the tutorial linked above from when I made the pink blanket.

I have some pieces of fabric left.  I think I'll make some burp cloths for her from those.

This post is linked to WIP Wednesday

Monday, February 11, 2013

A bowl for my sewing pins...


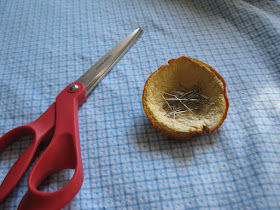
I peeled an orange in such a way that I had half of the peeling intact.  Then I set it on a shelf near the wood stove and let it dry, which only took a day.  It makes a nice little bowl for sewing pins when I need to use a lot of them.  It's easier than using a pin cushion (although I have 2 of those and love them), as I can pick up a pin without having to look at it.  

A humble post, but I do like my little bowl.

This post is linked to Simple Lives Thursday

Saturday, February 9, 2013

A beautiful morning...


Just some personal musings, and then another note about my quilt...  When I was 3-years-old, my parents passed away.  Shortly thereafter, I was adopted by my father's sister and her husband, my aunt and uncle.  They were a young childless couple.  I was greatly loved and kindly treated.  My new mom quit her job, which she had taken during WWII, as many women did then.  She came home to raise me, full-time.  What a wonderful home I had.  I was pondering about it this morning.  My heart swelled with gratitude for the sacrifices they made for me, by choice.  Mom stayed home and fed me 3 nice meals a day, sewed most of my clothing for a number of years, gardened, and taught me so many things. My dad had a good job and worked hard providing for all of us. I can never "re-pay" it, but I do wish to live my life in such a way as to honor their kindness...

I hope, when it is my time to go home to meet them, that I won't look back to now, and think that I wish I had lived my life differently.  I know we will all have regrets.  But I hope not to take on any more than necessary. 

Here you can see where I am hand-quilting my new quilt.  I just have it lying on a work table.


A closer look at my hand stitching - far from perfect, but I suspect by the time I get this finished, my stitches will be more even. 


It is very gentle, relaxing work.

Tuesday, February 5, 2013

Soothing Hand Cream


This is a simple and lovely way to make hand cream. When you use it, only use a tiny amount.  It isn't necessary to use enough to make your hands oily.  It is as if the oil is just a carrier for the yummy beeswax!

1/2 cup olive oil (I used extra-virgin, but you don't have to.)
1 ounce pure beeswax

Put these ingredients in a little jar.  Set the jar on top of an old canning ring in a small saucepan.  Fill the pan up with water to about halfway up the jar.  Heat on medium heat and stir from time to time until the beeswax is completely melted.  Carefully remove jar from pan (it is hot!) and allow to cool completely.  Place a lid on your jar.

That's it!

I love this cream.  It will seem a big stiff, but just get a little bit with your finger and as you rub it on your hands, it will melt immediately.  If your hands seem oily, you've used more than necessary.

Monday, February 4, 2013

Quilt progress report #2

I have my humble quilt top completed.


Where I have to lay it out on the floor in the dining room, I can't get far enough away from it to get a picture of the whole top!


If any "real" quilters are looking at this, I'm certain you are not impressed, but I am quite happy with how it came together.  Now I will need to layer it with the batting and the backing and then decide how I want to actually do the quilting.  Then, I'll bind it!  When it's finished, I'll report back.

Linked to The HomeAcre Hop!

Freezer Stew...

From time to time, I need to use up the little bits I've tucked into our freezer above the refrigerator.  Things like sliced chicken leftover from other meals, packages of small amounts of vegetables, etc...  Today was the day.  Here is what I used:

3 small packages of chicken meat
1 package of frozen corn kernels from our garden
a small amount of frozen peas from the store
Some potatoes that I had cut up and soaked for making French fries
Frozen green peppers from the garden

Here is all of that.
 
To that, I added the following:

About 1/2 cup of "sun dried tomatoes" that I had put up in olive oil in the fridge last summer
1/4 cup butter
1 small onion, diced
1 pint of leftover homemade beef broth out of the fridge
About 1 Tablespoon of my preserved basil
1/2 teaspoon RealSalt
A few cranks of pepper

... and right before serving, I added 1/2 cup of sour cream (it has been languishing in the fridge since Christmas Day!)  :-0   But it was still perfectly fine.

Here's what I did:

In a cast iron Dutch oven, I melted the butter and added the tomatoes, diced onion and diced green peppers and sauteed that until the onions were fairly tender.


Next, I added everything else except the salt, pepper and sour cream.


 This, I brought to a boil, put on a lid and allowed it to simmer for about 20 minutes.


 When everything was tender, I salted it to taste, added a little freshly ground black pepper and then stirred in the sour cream.


Then I ate some.


My husband ate some too.  I have to say, this is not the BEST thing I've ever made, but it was satisfactory and a good method for using up those bits of food that might otherwise go to waste.  The rest of it is in a big jar in the refrigerator.  It will provide at least 2 more meals for us.


Please don't even try to copy my actual recipe.  Just pay attention to the method and use up your own cache of leftover food!