Friday, March 29, 2013

Fun in the goat barn!


In the second film, at the end, you will see "Badger," our Border Collie run by.  As you probably know, Border Collies are sheep dogs - herd dogs.  Badger's purpose in life has become running around and around the goat pen.  He is SO muddy this time of year.  The sad thing is, he hates being muddy, and tries, at first, to avoid it, but then his nature takes over and he loses it!  Every. Day.

We do love our goats.  They are so sweet and personable.  We also love the milk.

Tuesday, March 26, 2013

Kefir - Chapter 17

It has been over a year since I posted anything about kefir.  I still LOVE my milk kefir and drink some of it every day.  Like anything else I do for a long time, I refine my method as time goes on.  When I first began brewing kefir, I got my information on Dom's Kefir website.  It is a treasure trove of information... more than you can imagine.  If you would like to see, check it out HERE.

I had been led to believe that it is important to never use any metal with milk kefir production.  Now, however, I use a stainless steel mesh strainer to strain out my kefir grains.


For a long long time, I used a paper coffee filter and a rubber band to cover the brewing jar.  Now I just use a plastic lid and leave it loosely on the jar.


I used to put my grains in a pre-determined amount of fresh goat milk. (You may use any kind of milk.) But now, I just add enough milk to cover the grains well.

I used to strain out the kefir grains after 24 hours and then let the fermented milk sit at room temperature for another 24 hours before using.  Now, since I use a relatively small amount of milk, as soon as I strain it, I add it to my jar of liquid kefir in the refrigerator.


All of these changes together have made the process, at least for me, more streamlined, and my kefir is smooth and thick and lovely.


Some thoughts from a grandma on cloth diapering...


Do you plan to use cloth diapers for your baby?  The current practice, at least among the young mothers that I know, is to buy the fitted (and expensive) diapers.  I would like to suggest an alternative...

I raised six children.  All were cloth diapered.  The fitted diapers were not available in those days.  Folding and pinning on cloth diapers is so very easy.  I am puzzled why anyone would want to go to the expense of buying, or even sewing their own fitted diapers.  Here are the types I used and some thoughts on each:

My first diapers were gauze pre-folded diapers that my sweet mother-in-law bought for me.  She gave me 4 dozen.  They were great and lasted for two of my babies before they got kind of thin and pathetic. When the baby is newborn, they are easy to fold to fit, and by the time the baby is walking, I used two at a time.  Voila!

Somewhere along the line, I procured some square, flat, Birdseye weave diapers. They were particularly nice for a newborn, but I used them all along, more than one as the baby got older.  I can still remember exactly how I folded them.  In fact, now that I think of it, I still have some of them and use them for other things.  For other things they are so great that a couple of years ago I bought some more!

My Very Favorite diapers appeared for my 4th baby.  They were squares of white terry cloth from England.  There were two weights.  One heavier than the other.  The lighter weight was used when the baby was littler.  Oh, my... such lovely and absorbent diapers!! I was still using them for baby #6. :)

Flat, as well as the pre-folds, wash easily, dry quickly, are Very Cheap compared to the sewn and fitted diapers.  I was in Wal-mart the other day and they had guaze pre-folds for about $12 a DOZEN!!!  If you would like, you could buy cotton terry cloth by the yard and either make your own (they should be about 27 inches square after washing and drying so wash and dry the fabric before cutting) OR ask a sewing friend to do it for you.

Another thing is, to help with the poop issue, if you wish, you could buy disposable liners, or even make cloth liners.  Want a frugal alternative?  Go to your local thrift store and purchase a flannel bed sheet.  You can easily tear it into the shapes you want your liners to be.  Just cut through the edge of the fabric, and then enthusiastically rip it all the way across!

Now, if money is Really Tight, scrounge up all the used flannel sheets you can buy or beg and make diapers out of those!  27 inches square.   Zig-zag the edges, or not.

Come to think of it, I remember now that I had some cotton flannel diapers at one time, but I don't recall when.

You will also need some "plastic pants" for covers.  They come in all sizes.  And some diaper pins or one of those cool things that stretches and ... well, like THIS.

Part of the time, I made wool diaper covers.  The first ones, I actually knitted from woolen yarn I had spun, later from some purchased wool yarn, and lastly, I would purchase wool sweaters at a thrift store, felt them in the washer and dryer, and then cut them up and make soakers out of them.  They were great!

The reason I am writing about this, is I think that some young mothers think that the expensive all-in-one diapers are the only alternative.  Simply Not True!  And if you find yourself in a situation where you can afford next to nothing, you can cut up and use old t-shirts, or anything that is soft and absorbent.  Baby won't care one whit!

I had older women to show me how to fold cloth diapers.  Now, we have YouTube!  :D

Best wishes to all of you mothers of babies.  I hope these thoughts will help at least one.

  This post is linked to:

Friday Baby Shower #6

Thursday, March 21, 2013

I think I'm going to die of cuteness...

Can you guess what we did today?


I think you get the idea.  I have read that Buff Orphingtons are calm and affectionate, good layers of large brown eggs and cold tolerant.  Precisely what I need (and want.)  We haven't had chickens for several years and I am very happy!  My husband is going to build a chicken coop soon.  :)

The other cuteness is living in our garage right now.  4 baby goats.  3 girls, one boy, all spoken for.  They are SSSSSOOOOOOOOOOOOOOOOOooooo cute!  I love bottle feeding baby goats!  Half LaMancha and half pigmy.

Sunday, March 17, 2013

My husband is so smart...


A dear friend recently bought a "Henry Milker" for milking her goats.  I admired it and so my sweet husband read up on it, watched some YouTube videos about similar things and fabricated one himself for a lot less money.  He's amazing!  The next plan is to buy an old refrigerator compressor and set us up so we can do it with electricity.  We have always milked by hand, and I really enjoy that, but I have arthritis in my hands, and also our current does are difficult to milk, because their faucets are unusually small.  So, this will be a blessing.  I'm so proud of him.

This post is linked to the Clever Chicks Blog Hop!

Friday, March 15, 2013

Lookie! lookie!!

When I got back from running errands this morning, look what was waiting for me!


Wednesday, March 13, 2013

I have two ironing boards...

Many years ago, my daughter, who was a teenager at the time, told me that when she grew up and had her own home, her ironing board cover was NEVER going to be dirty, like mine.  :)  Fast forward a few years... she is married and has a little girl of her own.  I went to visit.  In an email before I went, she said this, "I can't WAIT for you to see my dirty ironing board!"  :D

Well, I have TWO ironing boards.  My first, and most beloved actually was owned by my grandmother.  It is All metal and STURDY, and heavy.  It's great!  I also have a small tabletop ironing board that I use when I am doing things like piecing a quilt and need to do a lot of small ironing during the process.  I put it on the table beside me and so it saves time.

Both boards had disgusting covers.  They didn't start out that way, of course.  That's Just What Happens!  I was recently inspired by this wonderful YouTube video: http://www.youtube.com/watch?v=UV7ocoiil2o

Wendi Gratz has lots of nice videos about hand sewing, embroidery and all sorts of things. You can put her name in the search field at the top of YouTube to find them.

Back to the blog post...  Last night, using Wendi's instructions, I recovered both of my ironing boards!  Here are some pictures.  I didn't take any "before" pictures... just TOO scary!

The cover for the large ironing board I made from a pretty cotton percale sheet I found at a local thrift store.


Here it is.


I covered the smaller ironing board with a piece of cotton fabric that I've had FOREVER.  I suspect it was probably my mom's.


And here it is, finished! By the way, I used a small safety pin instead of the blunt end needle she used.  I don't have one of those.


It's so pleasant to have nice clean covers!  The old ones were getting so worn and dirty, I was getting reluctant to use them.

Please take a moment and go to Wendi's sweet website here:  ShinyHappyWorld  

How is your ironing board looking?

This post is linked to Simple Lives Thursday!

Saturday, March 2, 2013

March 2013 ~ What's left of the garlic...


Here is all that is left of my 2012 garlic!  I didn't want you to feel sorry for me... I just want you to see how well this variety keeps!  I just have it hanging in a basket above the kitchen sink.  It's very warm and dry up there.  The cloves are still crisp.  It's an amazing variety.  By the way, I still have some seeds to give away if anyone is interested.  You'd just need to send me an SASE with two first class stamps.

Friday, March 1, 2013

Frugal Fruit...

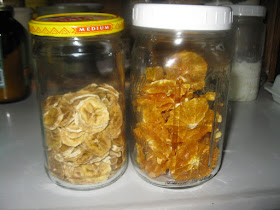
I had a few oranges that were not looking really nice anymore.  I cut off the peels, sliced the flesh into about 1/4 inch slices and dehydrated them.

I also had a few bananas that were very ripe.  Not black, just very ripe.  I peeled them, sliced them and dehydrated them at the same time.

Yum.


This post is linked to Clever Chicks Blog Hop!