Showing posts with label Meat. Show all posts

Wednesday, December 23, 2015

Tiny tip - Pesky Parchment Paper...

When I was a girl, there was "Wax Paper" (there still is, of course) but that was long before there were any plastic bags, and certainly, we didn't have parchment paper to use in the kitchen.  I am not sure when that became available.  It is very nice stuff, but if you buy it in a normal store, it's pretty expensive, too.  I was able to get a large box of it at Sam's Club at a very reasonable price, and since I rarely have a need for it, this box will last me a long time.  Since I have Silpat sheets, I don't use it under cookies and things like that in baking.  For dinner today, I am making a meat loaf (recipe below).  I decided it will be much easier to safely remove the loaf from the baking pan if I could line it with parchment paper.  I ran across this tip on Mrs. Volfie's YouTube video.  It's brilliant!  What she does is crumble up the piece of parchment under running water.  Then it is Very Easy to line your baking pan! 


Voila!

Meat loaf recipe

2 pounds ground meat (I used 1 pound beef and 1 pound venison)
2 eggs
2 slices bread, broken into little pieces
1/3 cup milk
2 teaspoon sea salt
1/4 teaspoon pepper
fresh or dried basil leaves, as much as you like (I didn't measure it)

Mix all of that together thoroughly,  pack it into a lined or greased loaf pan and bake for 1 hour at 350F, until the internal temperature is at least 160F ( I check with a thermometer.)

Thursday, January 23, 2014

Pressure Cooking - Chapter 6

Here is a One-Pot meal I made in the pressure cooker for supper tonight.  It was delicious! Everything turned out very nicely - but next time I will make a couple of changes, which I will explain below:

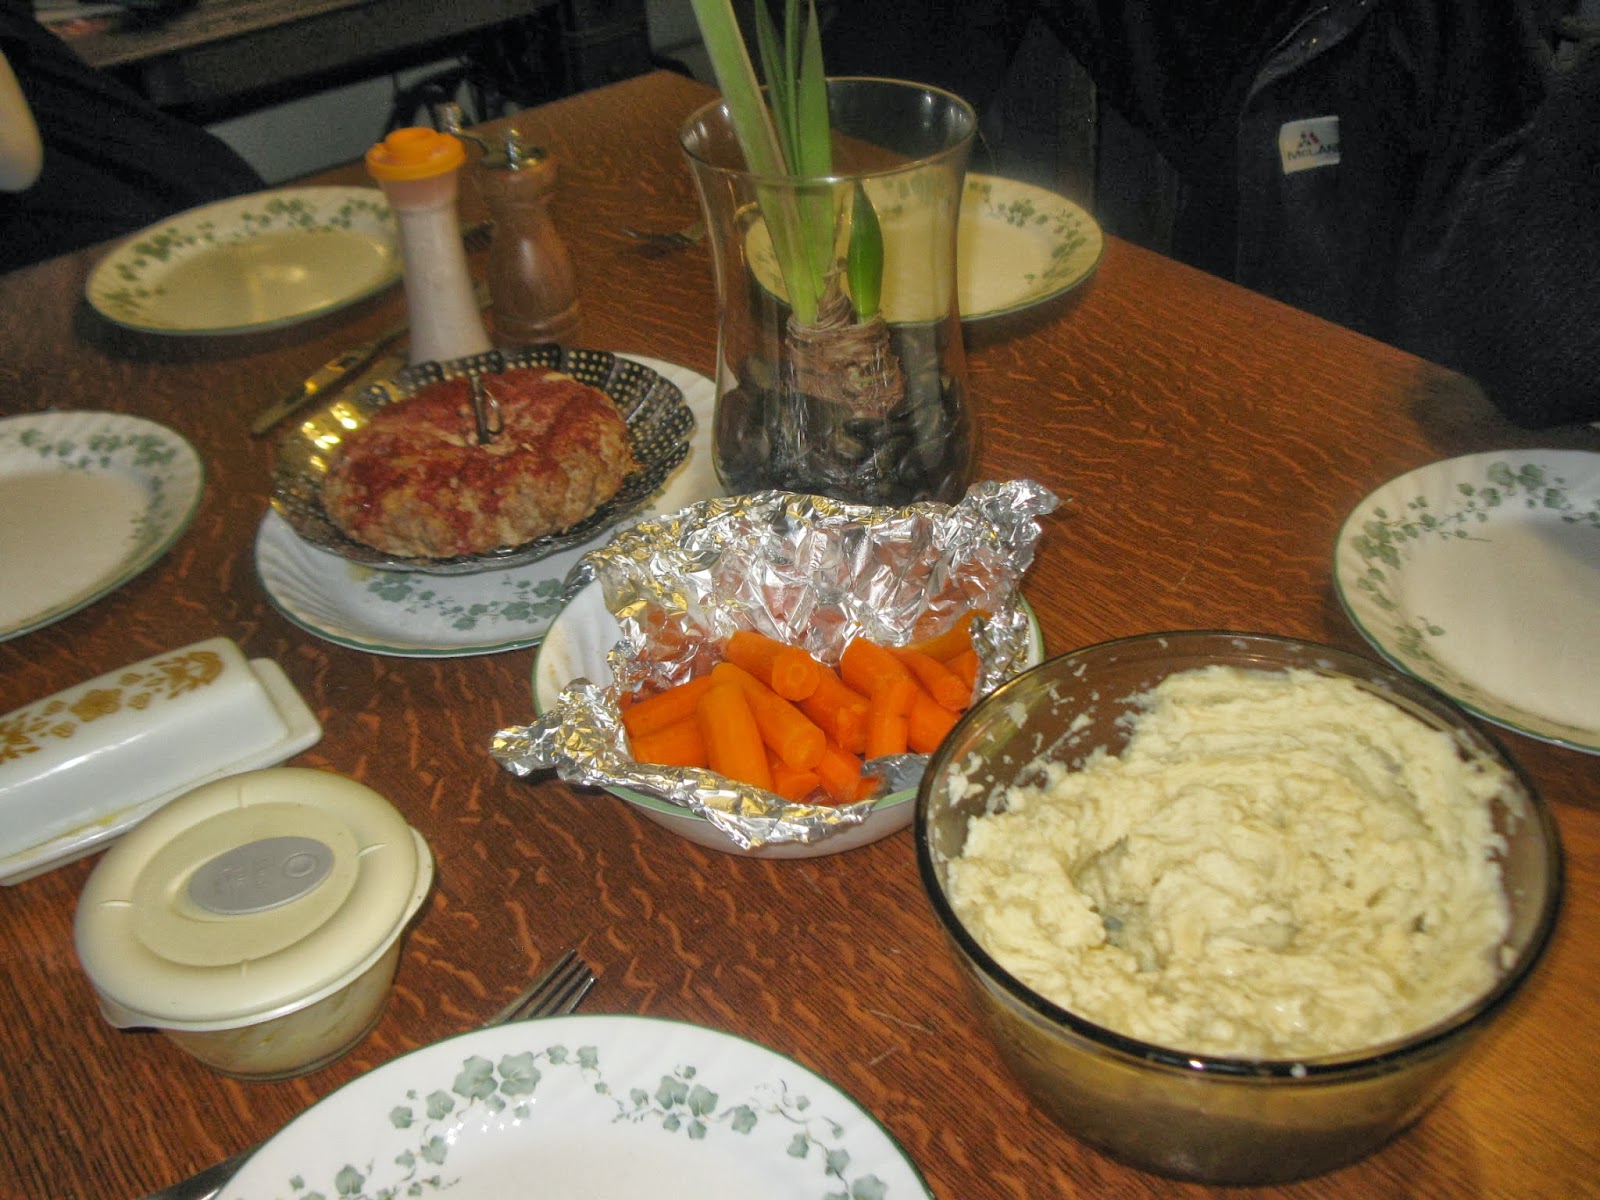
Pressure Cooker Meatloaf, Carrots and Mashed Potatoes
In a 6-quart pressure cooker - pour in two cups of water and place the trivet.


Scrub potatoes and add them in one layer on top of the trivet.


Combine for the meatloaf: 1.5# ground meat (I had lamb so that's what I used), 2 eggs, 1 medium onion, finely chopped, 1 cup soft whole-wheat bread crumbs, 1 teaspoon salt, 1/4 teaspoon freshly-ground pepper.  Stir together with a fork and then finish up the mixing with your hands so the ingredients are thoroughly mixed.


Butter another trivet.  Next time I will use the steamer rack that I show you below, to make it easier to lift the meat from the pan.


Form the meat mixture into a squat donut shape.


Place it on the buttered trivet or steamer rack.


Here is 3/4 cup tomato sauce.


Pour it over the meatloaf.


Peel some carrots and wrap them tightly in foil.  NEXT time I will slice the carrots as they were not quite done enough.


Place the packet of carrots on top of the meat. Put on the lid, bring up to pressure.  Reduce heat until the petcock is rocking gently.  Cook, at pressure, for 15 minutes.  Remove from heat and cool quickly under cold running water until the pressure is gone.


Open the cooker, remove the carrots.  Check the internal temperature of the meatloaf with a thermometer.  It needs to be at least 155 degrees F.  If it is not, after you remove the potatoes, place the steamer basket back in the cooker, put the lid on loosely and put the cooker back on the stove and steam the meat for a few more minutes.  Check the temperature again.  


While you are steaming the meatloaf, remove the skins from the potatoes and prepare mashed potatoes.  I like to add butter, cream cheese, milk and salt to ours.

Here is the meal.  We ate it all!  (There are 6 of us.)


This was easy and economical, and as I said above, next time I will slice the carrots and use the steamer basket for the meatloaf instead of the trivet.  

Monday, January 20, 2014

Pressure Cooking - Chapter 5

I am here today to humbly acknowledge a pressure cooking failure.  :'(  It's ok.  I rescued it, but I want to tell you what happened so you will avoid my mistake.

On the third Sunday of each month, our congregation at Church has a potluck dinner after our 3-hour block of meetings.  Saturday evening, about 7 p.m., I suddenly gasped and said, "Oh!  Tomorrow is the pitch-in lunch!"  Fortunately, it was early enough in the evening that I could make some food to take without having to stay up half the night.

I made a triple batch of chocolate brownies, without walnuts, because our grandson is allergic to walnuts.  I also made a batch of WHITE "Jiffy Buns" from the wonderful Whole Foods for the Whole Family cookbook.  Mine was published in 1981 by La Leche League. There are more recent editions available.  That recipe calls for whole wheat flour and makes wonderful buns, but for this occasion I decided to make white flour buns. Oh, my goodness they were soft and lovely.  It only takes an hour from start to finish.  Fabulous when you are in a hurry, and the dough can be used to make buns, rolls, cinnamon rolls or bread or whatever you like.

I had a large pork sirloin roast.  I decided to make pulled barbecue pork for sandwiches.  That is why I made the buns.  However the roast was frozen solid.  I thought... "Aha!  I could cook this in the pressure cooker real fast!"  THAT was a Big Mistake.  I cooked it, on the trivet, with 2 cups of water for an hour at pressure.  Still raw in the middle, so I gave it 30 more minutes.  Still not done enough and the outside was getting overcooked.  What to do... what to do... so I put it in the crockpot and poured the cooking liquid and quite a bit of barbecue sauce over the top of it and cooked it on low overnight.  In the morning, it was nicely done.  I did have to discard some of the very very done bits from the outside, but the rest of it was fine.  I pulled it apart, added barbecue sauce, and it was yummy.  No One Complained and it was All Gone at the end of the meal, as were the buns.

So, don't do what I did.  If your roast or large piece of meat is frozen. please thaw it first if you wish to pressure cook it.  OR, just do it in the crockpot from the start.

Here is the frozen roast.


Here is what it looked like after 90 minutes of cooking.  Still not done enough.


Saturday, January 18, 2014

Pressure Cooking - Chapter 4

I used the pressure cookers for dinner again yesterday.  This time, it was pork loin chops in one cooker and potatoes, carrots and cabbage in the other.  I learned something new.  I filled the 4-quart cooker with potatoes, carrots and a large chunk of cabbage, the trivet and 2 cups of water.  It was cooked at pressure for 10 minutes, and quickly cooled under running cold water.  When I opened it, the cabbage was not done.  :(  So I gave it two more minutes.  It was done then, but the potatoes and carrots were too done.  It all still tasted good, but next time I'll cut the cabbage into smaller pieces.


I browned the pork loin chops in lard in a cast iron skillet,


placed them all in the pressure cooker with two cups of water under the trivet, cooked them at pressure for 12 minutes and let the pressure go down naturally.  They were wonderfully tender. 


I also made a batch of  Melynda Brown's wonderful sourdough biscuits and baked them in our toaster oven, thus not heating up the large oven for a small item.  I love these.  They are substantial, keep well and worth eating.  You can even split and toast them!  Thanks, Melynda!


So, that was our meal, and was enjoyed by all.  Have a wonderful weekend!

Wednesday, June 26, 2013

Canning Sausage

My friend and her husband will soon be having two hogs butchered and so she is trying to get her freezers cleared out.  Yesterday she gave me 13 pounds of bulk sausage.  She suggested I could can it, so that's exactly what I did!  I ended up with 8 pints of sausage patties and 11 pints of the meat, browned in our big skillet.

 Here is how it came.  I left it overnight in these Styrofoam coolers so it could thaw slowly.  It worked perfectly.  It was still partially frozen so that made it easy to slice the patties.


Here are 3 pounds browning...


This shows you how they were sliced:
 

Here the slices are browning:
 

I was able to fit 5 patties into each wide-mouth pint jar.


It took both canners to accommodate the 19 jars.


 The jars just came out of the canners:


After cooling for a while.  I did not put on any extra liquid before they were processed.


Canning meats is very easy... much easier than canning vegetables.  These pints had to be pressure canned for 75 minutes at 11 pounds pressure, after 10 minutes of "exhausting" the canners.  If you want to do this, and have not canned before, please be sure to consult a reliable canning guide like this one.

Canned meat will last for a long time in the jars without losing quality.  It is very convenient to have in the pantry for quick meals.

Wednesday, June 19, 2013

Paper towel saving tip...

For most things, I don't use paper towels.  It seems wasteful.  I have plenty of cloths and rags to use instead.  However, when I fry bacon, I do drain it on paper towels.  I don't want to throw really greasy things into my laundry.  Today I fried up a 3# bag of bacon ends and pieces (which are about half the price of regular slices and taste just as good.) 

For that amount of bacon, it would take a number of paper towels for draining.  Instead, I put down a pad of newspapers and just ONE paper towel on top.  Works perfectly!


I bought four 3-pound packages today.  We read that there is a virus affecting hogs in many states, and that the death rate, when they are infected is 50%.  I just thought I'd stock up on bacon! 

I like to fry up these large amounts all at once, and then freeze them in meal-sized pieces.  It's very convenient to get breakfast together this way.

Monday, May 6, 2013

Pork neck bones...

A friend gave me the neck bones from a hog they had butchered.  She said she wouldn't use them. She knows I'll eat "anything!" ;)  A few months ago, I blogged about the benefits of bone broth HERE.  If you have not taken up making good, nourishing broths for your family, you are missing out on an easy and economical way to boost nutrition.  

A quote from the Weston A. Price Foundation ~ "Good broth will resurrect the dead," says a South American proverb. Said Escoffier: "Indeed, stock is everything in cooking. Without it, nothing can be done."

I did not take pictures of the whole process, but here is the lovely, gelatinous stock I ended up with:


...and here is the meat I pulled off the bones after cooking.  There was more than two POUNDS of meat!  If I ever get pork neck bones again, I think I will cook them like ribs with barbecue sauce!  The meat is tender, juicy and delicious.


Pork Neck Bone Stock

Neck bones from a butchered hog
1 large chopped onion
2 stalks celery, chopped
2 carrots, cleaned and sliced thinly
water to cover

Place all the ingredients in a Crock Pot, cover them with water, put on the lid and set on "low."  Let it slowly cook for 24 hours.  Allow to cool.  Strain the stock through a sieve and set the bones and meat aside.  Pick the meat from the bones.  Discard the spent bones and the vegetables.

Use your lovely, healthy, stock to make soups, sauces, or just to drink with some salt added, and heated up in a mug.  Yum.  

This is particularly wonderful for someone who is ill or an invalid.  Nevertheless, drinking bone broth every day is advisable for everyone.
Related Posts Plugin for WordPress, Blogger...