Thursday, April 29, 2010

Egyptian Onions


Egyptian Onions, or "Walking onions" as they are sometimes called are amazing plants. Last fall a friend gave me some of the "sets" and I just planted them in a pot to wait until I had a place to plant them in the ground. In this photo, they look rather sad, but is because I just got done transplanting them. When they take hold, they will be big and beautiful. Each plant will make a cluster of small bulbs at it's tip and when it is heavy enough, it will fall over and plant each one of those and start it again. You can eat any part of the plant, and the green is very nice in cooking. The little bulblets are fun to use also. They are extremely hardy and require almost no care. For an easily sustainable comestible, I heartily recommend them! Here is a Wiki article if you would like to see other pictures and read a little more about them: http://en.wikipedia.org/wiki/Egyptian_onion

Hmmm... "comestible" is an adjective. Oh, well. What I should have said is you can't kill these with a stick! ;-)

Wednesday, April 28, 2010

It's almost time...

Our sweet neighbor came and mowed the grass again today. He's been doing it since my husband got sick. (He is doing well, thank you.) What a blessing a good neighbor is. He won't take any money, he won't take any gasoline. All he wants is some tomatoes from our garden. :-)


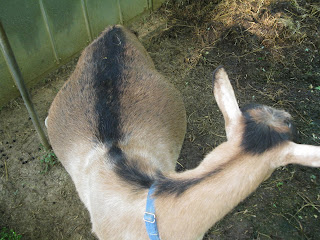
Yes, it's almost time for the baby goats to arrive. Here is "Abby." She is a 4-year-old American Alpine, and is obviously in a family way. She is due to kid on May 3rd, and her companion, "Gracie" is due on May 12th.


I've been having a nice vacation from milking for 2 months now. That means my life is not in the parenthesis of milking at 7 a.m. and 7 p.m. every day. I love milking, and I certainly love having all the lovely milk and making cheese and all of that, but it's so nice to have a break.This picture is of my brand new bottle brush that came in the mail today! It is for cleaning the glass pop bottles I will be using to feed the baby goats soon.


I have been trying hard to prepare for this new season, and have done some serious house cleaning today. I think I'll be able to finish it up tomorrow, and do some transplanting in the garden, and then everything will be ready. The birthing supplies are clean and ready in the barn. Soon I will wash and sanitize all of my milk equipment. I feel a little like the drivers at the Indianapolis 500 mile race must feel when the announcer says, "Gentlemen, start your engines!"

Tuesday, April 27, 2010

Liver 'n Onions

I am 61 years old and have spent most of my life being "afraid" of liver. When I was a young girl, I went to spend the night at the home of an aunt and uncle. Aunt Gloria was so kind to me and she fixed a very nice dinner. The main course was fried calf's liver. I remember being conscious of the fact that it was a delicacy and that she had gone to a lot of trouble for me. So, I ate it with a smile on my face and told her how delicious it was. But it nearly gagged me. Oh, it was awful to my young pallet! After reading Nourishing Traditions, I realized we need to eat some liver (and other organ meats) on a regular basis. I bought some nice sliced beef liver at our local meat market. Sadly, I do not yet have a source of grass - fed beef, but will work on that. I cooked it, and it was tender, delicous and just all - round wonderful! My husband is very happy. He loves liver!

Here is how I did it for 2 people:

1/2 pound fresh sliced beef liver
1/2 cup unbleached flour with 1/4 teaspoon Celtic salt and some freshly ground pepper
1 large onion
2 T kettle lard

Peel and slice the onion thinly
Slice the liver into strips, maybe 1/2 inch wide
Heat a good frying pan on medium and melt the lard in it
Add the onions and cook until they are limp
Dredge the liver pieces in the seasoned flour and add to the hot pan

Saute', stirring with a spatula and cook until you cannot see any red at all on the liver pieces

Serve!

Makes my mouth water, just to be writing about it. It is so easy and CHEAP. I was able to buy the liver for $1.39 a pound. That means this main course for the two of us costs less than a dollar.

Sunday, April 25, 2010

Egg Holes

Have you ever made these? We used to call them "Egg Holes" and made them quite often when the children were young. It makes an easy and nice breakfast.

1 piece of bread (I used sourdough whole wheat potato bread)
butter
1 raw egg


Pre-heat a heavy frying pan on medium. Using a biscuit cutter, cut a hole out of the center of your slice of bread and then butter the slice on both sides. Remove the cut out portion, put the slice in your hot pan (and also the cut out circle). Put a little butter in the hole to grease the pan and crack an egg in there.


Let it cook until you can tell that the cooked portion of the egg is coming up well into the bread, then flip both things over and cook until the egg white is done. You can cut into it a little to check and make sure.


Here is my breakfast! I put some raw honey on the round piece. The little glass has some milk kefir with some Sucanat in it. :)


These are so quick and easy and kid-pleasing too.

Wednesday, April 21, 2010

Bananas


Our local Save-a-Lot grocery store sells their ripe bananas for 19 cents a pound. When I happen to be there and they have some, I stock up! I peel them and put them in bags into the freezer. I love to eat just a plain frozen banana. My healthy version of a frozen fudge bar. :) I also use them in nice thick fruit smoothies - better than a milk shake! And occasionally I make banana bread and it is so handy to have them in the freezer and not be worried that they will go to waste.

Spring in the Greenhouse

It is a perfect day for catching up in the greenhouse. Cool outside and sunny, so nicely warm under the plastic. This first picture is of the transplants I am growing. Underneath them is horse manure, more soil, and then you can see one of the wire wickets I put up for really cold nights and draped clear plastic over that. I have several kinds of tomatoes, 2 kinds of peppers, cabbages, broccoli, zinnias, marigolds, and Basil . I plan to transplant them into little paper pots, at least some of them, today.


Here is a view out the door.


And looking the other direction...


Some carrots I harvested for dinner.


And lots of nice Swiss Chard. This time of year, since I planted it last August, it starts to try to go to seed. I just cut those bolting stalks off and keep eating it. It will continue to produce all summer long. I love Swiss Chard. It tastes a lot like spinach and is much less fussy.

Tuesday, April 20, 2010

Money saving tidbit

*blush* I just have to share this. I read in the book, Eat Fat, Lose Fat that some people use coconut oil for an underarm deodorant. I use extra-virgin coconut oil in my cooking, so decided to give it a try. It works very well. And it doesn't stain clothing. Besides, it smells nice. Now, I am 61 years old. It may be that for a younger person it might not be as effective, but it has been successful for me.

http://www.swansonvitamins.com/SWF035/ItemDetail?n=0

One of these jars would be a lifetime supply!

If you try it and are not pleased with the results, it is also an excellent skin moisturizer. One of my daughters, who is now 32, has struggled with a low-grade case of acne since she was a teen and since she's been using this oil, she's had no trouble and it is saving her a lot of money.

And then, of course, you can eat it and cook with it. It is very healthy.

Sunday, April 18, 2010

Water Kefir Adventures


As promised, I am at long last reporting on my adventures with "Water Kefir" grains. These grains differ from milk kefir in that they grow on sugars, and not milk. They multiply very rapidly, but the "grains" do not increase in size individually. They just increase in number.

They are very easy to tend and make a wonderful healthy probiotic drink. Here is what I do:

Day 1: Place grains in quart jar. Add 2 Tablespoons raw honey, one slice of lemon (I peeled off the outer zest as my lemons are not organic) a dried fig or a few raisins in a little cloth bag, and 2 cups of chlorine-free (CL) water. Stir with a plastic spoon. Water Kefir does not like metal. I cover it with a plastic sprouter lid that I have (not necessary, just very covenient) and a coffee filter held on with a rubber band. Set it on the counter.

Day 2: After 24 hours I take off the coffee filter and drain the Kefir water into another jar. Then I remove the plastic lid and use CL water to rinse the grains and strain again.

At this point, I add 2 Tablespoons of Sucanat (another brand is Rapadura), 2 cups of CL water, stir, and cover as before.

Each day it needs to be drained, rinsed and fed. The grains will multiply rapidly and you can share, freeze, compost, sell or toss the extras.

Put your kefir water into the fridge in a covered glass jar if you are not going to use or drink it right away.

But my favorite thing is to make homemade soda pop! See the two capped bottles in the picture up there? I do it like this: Pour kefir water into a jar or bottle that has a tight lid. Add half as much fruit juice. Let it sit, tightly covered for 12 to 18 hours (taste to see what pleases you) and then keep it in the fridge.

One of our daughters is making this soda and her children love it! And I really enjoy having "pop" that I know is healthy and loaded with probiotics.

I have had good success with orange juice so far. Grape juice seems to be better after a couple of days in the fridge. This is still an experiment and I will report back if I make any progress.

Some people use the water from young green coconuts to brew their kefir. It sounds lovely to me, but I do not yet have access to any coconuts. You can also use plain table sugar. There is a lot more to be known about this, and I urge you to do some reading on Dom's site here: http://users.sa.chariot.net.au/~dna/Makekefir.html

The slotted spoon contains a few of the grains for you to see.


UPDATE!!!

Since this original post, I have discovered that I have to use flip-top bottles to make the kefir soda-pop. Nothing else will keep the fizz in for long. Here are the kind I use now:

I also have gone to feeding just Sucanat to my water kefir grains ~ 1/4 cup per quart with non-chlorinated water. It is much easier than what I used initially.

Monday, April 12, 2010

Update on DH

My husband is improving. They moved him into isolation yesterday when they found out what he is carrying. But he sounded MUCH better this morning. I am so relieved!

Sunday, April 11, 2010

Life.

In case you are holding your breath waiting for me to post again .... my husband was admitted to hospital today with bacterial pneumonia. There has been quite a bit of other hoopla going on since we came back from Florida (he got sick there) so I've had very little time. I will be back with my water kefir adventures as soon as I can. You can breath now.

Wednesday, April 7, 2010

Report on Leafy Green Fermented Vegetables

We are back! I just tried the leafy green ferment that I promised to tell you about. It is a success! It tastes a lot different than sauerkraut, but it fermented nicely and I do like it. I plan to eat a little every day until it is gone and then start eating the cabbage kraut and make another jar to ferment for when it is gone. I am excited that it worked, since I was really making it up as I went!
Related Posts Plugin for WordPress, Blogger...